
Get ready to indulge in the ultimate treat with my Chocolate Thumbprint Cookies Irresistible Recipe Guide! These cookies are rich, soft, and perfect for sharing (if you want to!). I’ll walk you through every step, from selecting the best ingredients to creating fun flavor choices. Whether you want classic chocolate or something unique, this guide has it all. Let’s dive in and make something sweet together!
Why I Love This Recipe
- Decadent Chocolate Flavor: These cookies are packed with rich cocoa, making every bite a chocolate lover’s dream.
- Easy to Make: With simple ingredients and straightforward steps, you can whip up a batch in no time.
- Customizable Filling: Whether you prefer chocolate ganache or a spread, you can tailor the center to your liking.
- Perfect for Any Occasion: These cookies are great for parties, holidays, or just a sweet treat at home.
Ingredients
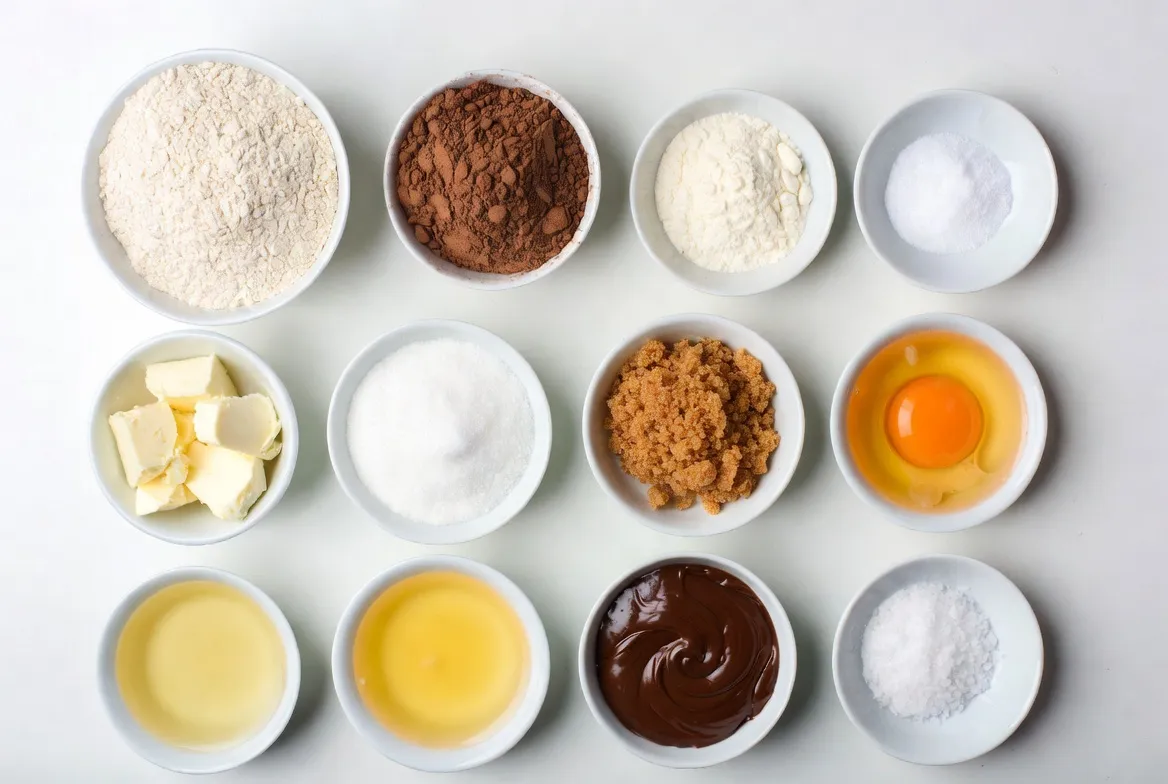
Complete List of Ingredients
To make these tasty chocolate thumbprint cookies, you need these simple items:
– 1 cup all-purpose flour
– 1/3 cup unsweetened cocoa powder
– 1/2 teaspoon baking powder
– 1/4 teaspoon salt
– 1/2 cup unsalted butter, softened
– 1/2 cup granulated sugar
– 1/4 cup brown sugar, packed
– 1 large egg yolk
– 1 teaspoon vanilla extract
– 1/2 cup chocolate ganache or your favorite chocolate spread
– Sea salt, for sprinkling (optional)
Ingredient Substitutions
You can swap some ingredients if needed. Here are some ideas:
– Use coconut oil instead of butter for a dairy-free option.
– Swap the all-purpose flour with almond flour for a gluten-free version.
– Use dark cocoa powder for a richer chocolate flavor.
– Maple syrup can replace granulated sugar for a different sweetness.
Tips for Choosing the Best Ingredients
Choosing quality ingredients makes a big difference. Here are tips to help you:
– Look for high-quality cocoa powder. It adds rich flavor to your cookies.
– Use fresh eggs. They help bind the dough well and keep it soft.
– Buy unsalted butter. This gives you control over the salt level.
– Choose a chocolate spread or ganache you love. It will shine in the final cookie.
– If using sea salt, pick a flaky kind for a nice crunch.
With these ingredients, you will create cookies that are both fun and delicious!
Step-by-Step Instructions
Preparation Steps
– Preheating the Oven
Start by preheating your oven to 350°F (175°C). This helps the cookies bake evenly. While the oven heats, line a baking sheet with parchment paper. This will keep the cookies from sticking.
– Mixing the Dry Ingredients
In a medium bowl, whisk together 1 cup of all-purpose flour, 1/3 cup of cocoa powder, 1/2 teaspoon of baking powder, and 1/4 teaspoon of salt. Mixing these dry ingredients first ensures even distribution of flavors. Set this bowl aside for later.
– Creaming the Butter and Sugars
In a large mixing bowl, add 1/2 cup of softened unsalted butter, 1/2 cup of granulated sugar, and 1/4 cup of packed brown sugar. Use a mixer to beat these together until light and fluffy, which takes about 2-3 minutes. This step adds air to the mix, making your cookies soft.
Forming and Baking the Cookies
– Shaping the Dough
Once the butter and sugars are mixed, beat in 1 large egg yolk and 1 teaspoon of vanilla extract until well combined. Gradually add the dry mix, stirring until just combined. The dough will be soft and slightly sticky. Use a tablespoon or your hands to scoop and roll the dough into 1-inch balls.
– Creating the Thumbprint
Place the dough balls on the lined baking sheet, leaving space between each. Take your thumb or the back of a teaspoon and gently press down in the center of each ball to make a small indentation. This is where the chocolate will go later.
– Baking Time and Temperature
Bake your cookies in the preheated oven for 10-12 minutes. They should look set but a little soft in the center. Once done, let them cool on the baking sheet for 5 minutes before moving them to a wire rack. This cooling time helps them firm up.
Tips & Tricks
Common Mistakes to Avoid
Many home bakers struggle with thumbprint cookies. One common mistake is not measuring the ingredients accurately. Use a scale for precision. Another mistake is too much flour. This makes the cookies dry. Always spoon the flour into your measuring cup and level it off.
Overbaking is another issue. Keep an eye on the time, and check the cookies. They should be set but soft. If they look too firm, they may end up hard. Lastly, don’t skimp on chilling the dough. If the dough is too warm, the cookies spread too much.
How to Achieve the Perfect Texture
To get the right texture, you want your butter soft but not melted. Cream it with sugar until it’s light and fluffy. This adds air and makes cookies soft. When mixing in the dry ingredients, mix just until combined. Overmixing will give you tough cookies.
Chill the dough for about 30 minutes before baking. This helps the cookies hold their shape. Bake them until they are just set. Let them cool a bit before adding the chocolate. This way, the ganache stays nice and gooey.
Enhancing Flavor with Additives
You can add fun flavors to your thumbprint cookies. Try mixing in some coffee or espresso powder with the dry ingredients. This adds depth to the chocolate taste. You can also add a bit of orange zest for a citrus twist.
If you want a nutty flavor, consider adding chopped nuts to the dough. Walnuts or hazelnuts work well. For a spicy kick, you can mix in a dash of cinnamon. Each of these will elevate your cookie and make it special.
Pro Tips
- Chill the Dough: For easier handling and to prevent spreading, chill the dough in the refrigerator for 30 minutes before rolling into balls.
- Use Quality Chocolate: The flavor of your cookies will greatly benefit from using high-quality chocolate for the ganache or spread.
- Perfect Indentation: To create a deep thumbprint, press down gently with your thumb, but be careful not to go all the way through the cookie.
- Experiment with Fillings: Try different fillings like fruit preserves, peanut butter, or even caramel to switch up the flavor profile of your cookies.
Variations
Different Fillings for Thumbprints
You can fill chocolate thumbprint cookies with many tasty treats. Here are some fun ideas:
– Fruit Preserves: Use your favorite fruit jam or preserve. Raspberry or apricot adds a nice tang. Just spoon a little into each cookie’s center.
– Nut Butters: Try peanut butter or almond butter for a nutty twist. They add creaminess and richness. Just place a dollop in each thumbprint.
– Caramel and Other Sauces: Drizzle warm caramel or chocolate sauce in the center. This makes the cookies even more decadent. You can even mix in a bit of sea salt for a sweet-salty bite.
Gluten-Free Version
If you need a gluten-free option, swap the all-purpose flour. Use a gluten-free flour blend instead. Make sure it’s one that works for baking. Check the label for best results. The rest of the recipe stays the same. You’ll still get soft and chewy cookies.
Vegan Adaptation
To make these cookies vegan, replace the butter and egg yolk. Use vegan butter for the fat. For the egg yolk, mix 1 tablespoon of ground flaxseed with 3 tablespoons of water. Let it sit for a few minutes. This mix works great as an egg substitute. Use your favorite vegan chocolate spread for the filling. Now you can enjoy these cookies without animal products.
Storage Info
How to Store Chocolate Thumbprint Cookies
Store your chocolate thumbprint cookies in an airtight container. This keeps them fresh. Place parchment paper between layers to avoid sticking. Keep them at room temperature for up to a week. If you want to keep them longer, freezing is a great option.
Best Storage Containers
Use glass or plastic containers with tight lids. These containers protect cookies from air and moisture. If you have a lot of cookies, use a larger container. This helps prevent crushing. Be sure to label the container with the date.
Freezing Instructions
To freeze cookies, let them cool completely first. Then, place them on a baking sheet in a single layer. Freeze for about two hours until firm. Once frozen, transfer cookies to a freezer-safe bag or container. Remove as much air as possible. You can freeze them for up to three months. When ready to eat, thaw them at room temperature. Enjoy them fresh!
FAQs
What is the Best Way to Make Thumbprints?
The best way to make thumbprints starts with soft dough. First, cream the butter and sugars well. This step adds air and makes your cookies light. I mix the dry ingredients in a separate bowl first. It helps to avoid lumps. When you shape the dough, keep balls about one inch wide. Use your thumb to create a nice dip. Bake until they look set, but do not overbake. This keeps them soft inside.
Can I Make These Cookies in Advance?
Yes, you can make these cookies in advance. You have two good options. First, you can prepare the dough and chill it. Wrap it well and store it in the fridge for up to three days. When you are ready, roll and bake. Second, bake the cookies and store them. Place them in an airtight container for up to five days. Just fill them with ganache or spread before serving for the best taste.
How Long Do Chocolate Thumbprint Cookies Last?
Chocolate thumbprint cookies last about five days when stored right. Keep them in an airtight container at room temperature. If you want them to last longer, freeze them. They can stay fresh for up to three months in the freezer. Just wrap them well to avoid freezer burn. When ready to enjoy, let them thaw at room temperature.
We covered how to make delicious chocolate thumbprint cookies. From picking the right ingredients to baking and storing them, each step is key. Remember to try different fillings for fun twists. Avoid common mistakes for the best texture and taste.
Enjoy your cookies fresh, or store them well for later. With the tips shared, you can now bake with confidence. Your cookie game is on poin