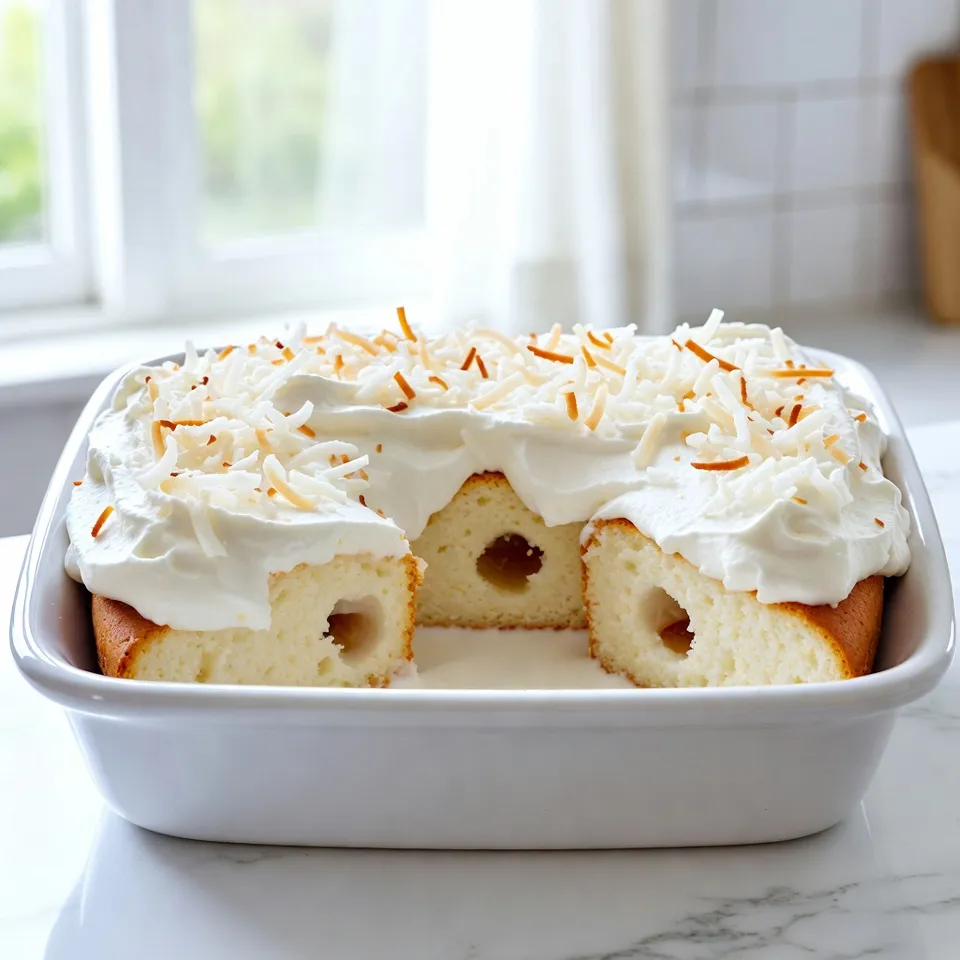
Craving a sweet treat that screams summer? Let me introduce you to my Coconut Cream Poke Cake! This simple dessert is a tropical delight made with easy-to-find ingredients. Whether you’re hosting a party or just treating yourself, this cake is sure to impress. Join me as we dive into each step that transforms basic cake mix into a creamy, coconut-filled masterpiece. Get ready to delight your taste buds!
Why I Love This Recipe
- Deliciously Tropical: This cake brings the taste of the tropics to your table with creamy coconut and sweet flavors that transport you to a sunny paradise.
- Easy to Make: With just a few simple ingredients and straightforward steps, this poke cake is perfect for bakers of all skill levels.
- Perfect for Any Occasion: Whether it’s a summer barbecue, a birthday party, or just a treat for yourself, this cake is a crowd-pleaser that suits any gathering.
- Make-Ahead Convenience: This cake tastes even better after chilling in the fridge, making it a great make-ahead dessert option for busy days.
Ingredients
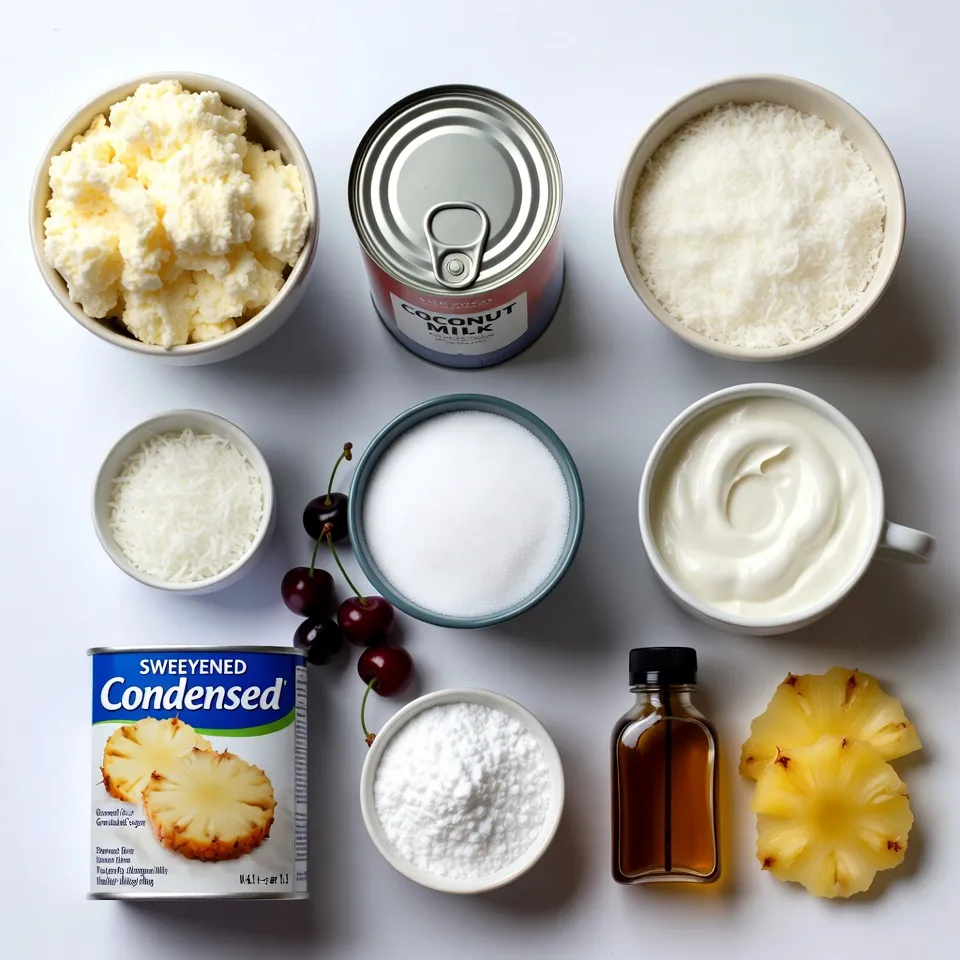
To make the Coconut Cream Poke Cake, gather these items:
– 1 box of white cake mix
– 1 cup coconut milk (canned, full-fat)
– 1/2 cup unsweetened shredded coconut
– 1/2 cup sugar
– 1 can (14 oz) sweetened condensed milk
– 1 cup heavy whipping cream
– 1/4 cup powdered sugar
– 1 teaspoon vanilla extract
– Extra shredded coconut for topping
– Fresh cherries or pineapple slices for garnish (optional)
These simple ingredients create a moist, flavorful cake. Using coconut milk adds a rich taste. The sweetened condensed milk gives a creamy texture. Don’t forget the shredded coconut; it adds great texture and flavor. You can add fresh fruit for a fun touch. This cake is easy to make, and you can find everything at your local store. Enjoy the process of making this delightful treat!
Step-by-Step Instructions
Preparation of the Cake
– Preheating Oven & Greasing Pan
Start by preheating your oven to 350°F (175°C). Grease a 9×13-inch baking pan with butter or cooking spray.
– Mixing the Cake Batter
Grab a box of white cake mix. Replace the water with 1 cup of coconut milk. Mix until well blended.
– Baking the Cake
Pour the batter into the prepared pan. Bake for about 25-30 minutes. Check with a toothpick; it should come out clean.
Creating the Poke Holes
– Cooling the Cake
Let the cake cool in the pan for about 10 minutes.
– Poking Holes for Filling
Use the back of a wooden spoon to poke holes all over the top. Make sure the holes are deep so the filling can soak in.
Adding the Coconut Filling
– Mixing the Filling
In a bowl, combine 1 can of sweetened condensed milk with 1/2 cup of sugar. Mix until the sugar dissolves.
– Pouring the Mixture Over Cake
Pour the sweetened mixture evenly over the warm cake. Sprinkle 1/2 cup of shredded coconut on top.
Topping with Whipped Cream
– Preparing the Whipped Cream
In another bowl, mix 1 cup of heavy whipping cream, 1/4 cup of powdered sugar, and 1 teaspoon of vanilla extract. Beat until soft peaks form.
– Spreading the Topping
Once the cake is cool, spread the whipped cream mixture evenly over the cake.
Final Garnishing and Chilling
– Adding Shredded Coconut
Top the cake with extra shredded coconut for a nice look.
– Optional Tropical Garnishes
You can add fresh cherries or pineapple slices for a fruity touch, if you like.
– Refrigeration Timing
Chill the cake in the fridge for at least 2 hours before serving. This helps the flavors blend beautifully.
Tips & Tricks
Best Practices for Baking
Choosing the Right Coconut Milk
Use canned, full-fat coconut milk. It gives your cake rich flavor and moisture. Avoid light coconut milk. It lacks the creaminess you want in this cake.
Ensuring Even Baking
Make sure your oven is preheated. Use an oven thermometer if needed. This helps the cake bake evenly. Place the baking pan in the center of the oven. That way, it gets heat from all sides.
The Importance of Cooling Time
Let the cake cool for at least 10 minutes. This helps the cake set before you poke holes. If you poke holes too soon, the cake may break apart.
Whipping Cream Tips
How to Achieve Soft Peaks
Start with cold heavy whipping cream. Beat it on medium-high speed. Watch closely as the cream thickens. Stop mixing when you see soft peaks form. This means it is ready for the cake.
Alternatives to Heavy Whipping Cream
If you want a lighter option, use coconut cream. It gives a nice coconut flavor. You can also use a dairy-free whipping cream. This way, everyone can enjoy the cake.
Pro Tips
- Use Full-Fat Coconut Milk: For the richest flavor and creaminess, always opt for canned full-fat coconut milk instead of light versions.
- Let the Cake Cool Completely: Ensure the cake is completely cooled before adding the whipped topping to prevent it from melting and sinking into the cake.
- Customize Toppings: Feel free to get creative with toppings! Add your favorite fruits or nuts for added texture and flavor.
- Chill for Best Results: Refrigerating the cake for at least 2 hours allows the flavors to meld beautifully, enhancing the overall taste.
Variations
Flavor Variations
Adding Pineapple Juice
You can change the taste of this cake by adding pineapple juice. Simply substitute half of the coconut milk with pineapple juice. This makes the cake fruity and bright. It pairs wonderfully with coconut. You can also add crushed pineapple to the cake mix for extra texture.
Using Different Cake Mixes
While white cake mix is great, you can try other flavors. A yellow cake mix gives a richer taste. A chocolate cake mix can create a fun twist. Just remember to keep the coconut milk in the recipe. This keeps the cake moist and delicious.
Dietary Modifications
Gluten-Free Options
If you need a gluten-free cake, use gluten-free cake mix. Many brands offer great options that taste good. Just follow the same steps as the regular recipe. Make sure to check the labels for gluten-free ingredients.
Dairy-Free Substitutes
To make this cake dairy-free, swap out the heavy cream. Use coconut cream or a dairy-free whipped topping instead. For the sweetened condensed milk, look for dairy-free versions. This helps you enjoy the cake without dairy.
Storage Info
Storing the Cake
To store your coconut cream poke cake, always use an airtight container. This keeps it fresh and moist. Place the cake in the fridge after it cools. The best practice is to cover it lightly with plastic wrap or foil before putting it in the container.
How long will it last? The cake stays good for about 3 to 5 days in the fridge. If you notice any changes in texture or smell, it’s best to toss it.
Freezing Options
You can freeze this cake if you want to keep it longer. Start by slicing the cake into pieces. Wrap each slice tightly in plastic wrap. Then place the slices in a freezer-safe bag or container. This helps avoid freezer burn.
For thawing, take a slice out of the freezer and leave it in the fridge overnight. This way, it thaws slowly and keeps its taste. You can also leave it at room temperature for about 1 hour before serving. Enjoy your cake even after freezing!
FAQs
What is a Poke Cake?
A poke cake is a fun and tasty dessert. You bake a cake and poke holes in it. This lets yummy liquids soak in. For this cake, we use sweetened condensed milk and coconut milk. The filling adds moisture and flavor. The cake becomes rich and creamy.
Can I Use a Different Flavor of Cake Mix?
Yes, you can! While white cake mix works well, you can try other flavors. A vanilla or lemon cake mix adds a nice twist. Chocolate cake mix can also work if you like a richer taste. Experiment with your favorites to find a new delight.
How Do I Know When the Cake is Done?
To test if your cake is done, use a toothpick. Insert it into the center of the cake. If it comes out clean, the cake is ready. You should also check the edges. They should pull away from the pan slightly.
Can I Make This Cake Ahead of Time?
You can make this cake ahead of time. It tastes even better after chilling. Make it a day before you plan to serve it. Just store it in the fridge. This gives the flavors more time to blend and makes it extra delicious.
This blog post walked you through making a delicious coconut poke cake. You learned about the key ingredients and each step from baking to chilling. I also shared helpful tips for baking and whipped cream. You can explore variations and storage options to make it your own. This cake is simple to customize, so don’t hesitate to experiment. Enjoy the fun of creating a sweet treat that impresses everyon