Are you craving a treat that combines rich chocolate and sweet cherries? Look no further! My Irresistible Chocolate Cherry Icebox Pie Delight is the perfect answer. With a simple list of ingredients and easy steps, you can create a dessert that wows your friends and family. From the buttery crust to the creamy filling, this pie offers a burst of flavors in every bite. Let’s get started on your delicious journey!
Why I Love This Recipe
- Decadent Flavor: This pie combines rich chocolate and tart cherries, creating a perfect balance of sweet and tangy in every bite.
- No-Bake Convenience: With minimal preparation and no baking required, this icebox pie is a breeze to make, especially on hot days.
- Impressive Presentation: The stunning layers of cream cheese and cherry filling topped with chocolate drizzle make it a showstopper for any gathering.
- Customizable Toppings: Feel free to get creative with garnishes—fresh cherries, whipped cream, or chocolate shavings all add a special touch.
Ingredients
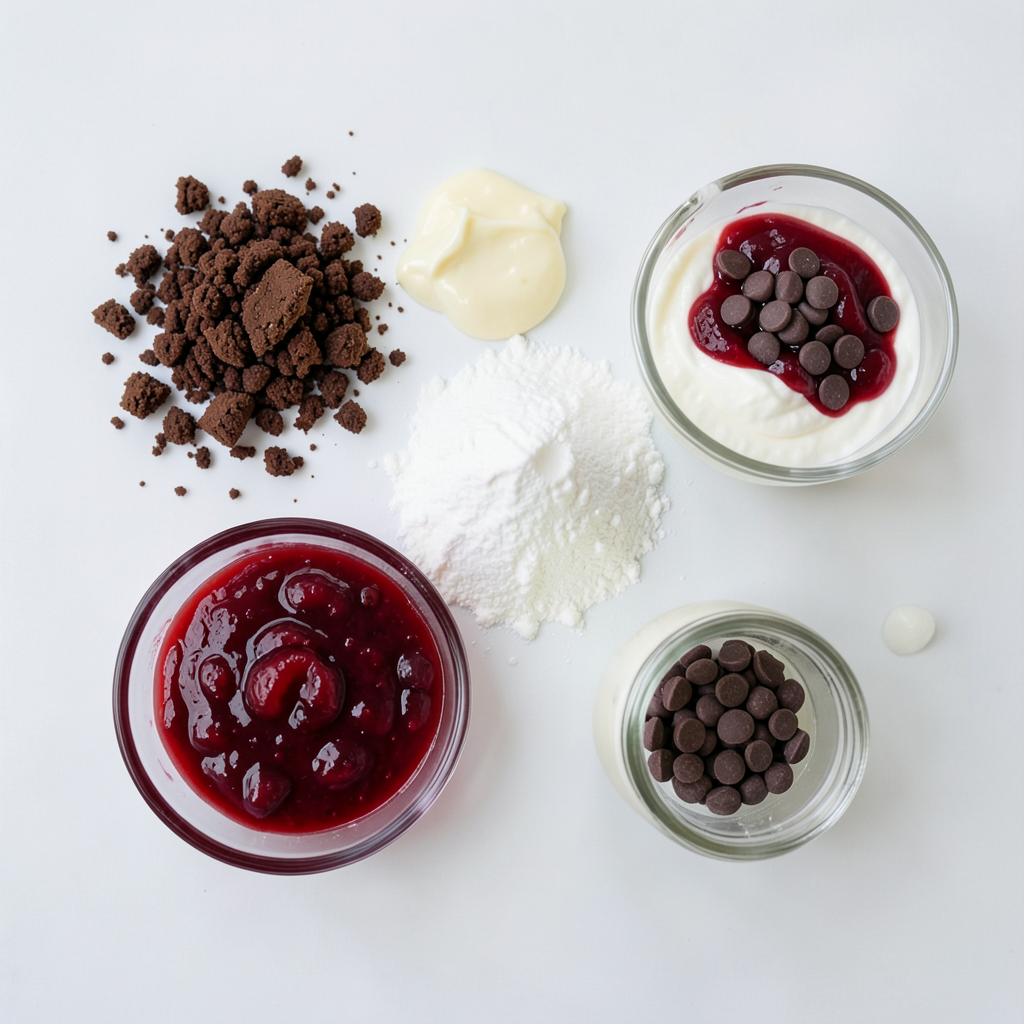
List of Required Ingredients
- 1 ½ cups chocolate cookie crumbs
- ½ cup unsalted butter, melted
- 2 cups cherry pie filling
- 1 cup heavy cream
- ½ cup powdered sugar
- 8 oz cream cheese, softened
- 1 tsp vanilla extract
- ½ cup semi-sweet chocolate chips
- Fresh cherries for garnish
Gathering the right ingredients is key to making a great Chocolate Cherry Icebox Pie. Start with chocolate cookie crumbs. These create a rich, sweet crust. Next, you need unsalted butter to bind the crumbs together. Melt it before mixing.
For the filling, grab cherry pie filling. This gives your pie its sweet and tart flavor. Heavy cream is essential for a light and fluffy texture. The powdered sugar adds just the right amount of sweetness.
Cream cheese brings a creamy richness to the filling. Make sure it’s softened for easy mixing. Vanilla extract enhances flavor and adds warmth. Semi-sweet chocolate chips are for drizzling on top. Finish with fresh cherries for a lovely garnish.
Now that you have all the ingredients, you’re ready to create a pie that will impress everyone. Each element plays a role in this delightful dessert. Enjoy the process and the delicious results!
Step-by-Step Instructions
Preparation of the Crust
To start, I take a bowl and combine 1 ½ cups of chocolate cookie crumbs with ½ cup of melted butter. I mix this until the crumbs feel like wet sand. Next, I press this mixture firmly into the bottom and up the sides of a 9-inch pie dish. This forms our delicious crust. I then refrigerate it while I prepare the filling.
Mixing the Filling
In a large mixing bowl, I whip 1 cup of heavy cream with ½ cup of powdered sugar. I whip it until soft peaks form. This makes the filling light and creamy. In another bowl, I beat 8 oz of softened cream cheese with 1 teaspoon of vanilla extract. I mix it until it’s smooth and creamy. Once both mixtures are ready, I gently fold the whipped cream into the cream cheese mixture until it’s well combined.
Assembling the Pie
Now, I pour half of the cream cheese mixture into the prepared crust and smooth it out. Then, I add half of the 2 cups of cherry pie filling on top of this layer. Next, I pour the rest of the cream cheese mixture over the cherries, followed by the remaining cherry filling. For a tasty finish, I melt ½ cup of semi-sweet chocolate chips in the microwave until smooth. I drizzle this melted chocolate over the pie.
Chilling the Pie
I cover the pie with plastic wrap and chill it in the refrigerator for at least 4 hours. For the best results, I suggest chilling it overnight. This helps the pie set and makes it easier to slice. Before serving, I like to garnish with fresh cherries if I have them on hand.
Tips & Tricks
Best Practices for the Crust
To ensure a sturdy crust, use fine chocolate cookie crumbs. Mix them with melted butter. This mix should feel like wet sand. Pack it tightly into your pie dish. This step keeps the crust from crumbling later.
You can also try variations in cookie crumbs. Use graham crackers for a different flavor. Ginger snaps add a nice spice too. Each option gives the pie a unique twist!
Perfecting the Filling
For the filling, achieving the right consistency is key. Whip the heavy cream until soft peaks form. This makes it light and fluffy. The cream cheese must be smooth before mixing. Beat it well with the vanilla extract.
For flavor enhancement, consider adding a splash of almond extract. This can boost the cherry flavor. You might also mix in some finely chopped dark chocolate for richness.
Presentation Ideas
Creative plating makes a big difference! Serve slices on colorful plates for a pop. Drizzle extra melted chocolate on top for flair.
Garnish each slice with fresh cherries. This adds color and freshness. Consider serving with a scoop of vanilla ice cream. The creaminess pairs well with the pie’s richness.
Pro Tips
- Use a Food Processor: To achieve fine chocolate cookie crumbs, consider using a food processor. This will ensure a uniform texture for your crust.
- Chill Your Mixing Bowl: For better whipped cream results, chill your mixing bowl and beaters in the freezer for about 10 minutes before whipping the cream. This helps achieve faster and stiffer peaks.
- Let it Set Overnight: For the best flavor and texture, let your pie chill overnight. This allows the flavors to meld and the filling to set perfectly.
- Garnish Just Before Serving: If using fresh cherries for garnish, add them just before serving to keep them looking fresh and vibrant.
Variations
Alternative Fruit Fillings
You can switch up the fruit in this pie. Try using blueberries or raspberries instead of cherries. These fruits pair well with chocolate. You can also mix different fruits for a fun twist. Just remember to keep the filling juicy but not too runny.
Dietary Modifications
If you want a gluten-free pie, use gluten-free cookie crumbs. You can find these at many stores. For a healthier option, try using sugar alternatives like stevia or agave syrup. These swaps help cut calories without losing flavor.
Chocolate Changes
Changing the type of chocolate can create new flavors. Dark chocolate adds richness, while white chocolate gives a sweet touch. You can also try different brands of chocolate. Each brand has its unique taste, so find the one you love best.
Storage Info
Recommended Storage Methods
To keep your Chocolate Cherry Icebox Pie fresh, store it in the fridge. First, cover the pie with plastic wrap. This keeps the pie moist and prevents it from picking up any odors. If you have leftovers, keep the pie wrapped and in a pie dish for easy access.
Freezing Instructions
If you want to save the pie for later, freezing is a great option. Cut it into slices before freezing to make serving easy. Wrap each slice tightly in plastic wrap and then place them in a freezer-safe bag. This will help prevent freezer burn. When you're ready to enjoy a slice, simply take it out and let it thaw in the fridge for a few hours. This keeps the texture nice and creamy.
Shelf Life
In the fridge, your pie will last about 3 to 5 days. Watch for signs of spoilage, like a change in smell or texture. If the pie looks dry or if the cherry filling starts to separate, it’s time to toss it. Enjoy it while it’s fresh for the best taste!
FAQs
Can I make Chocolate Cherry Icebox Pie ahead of time?
Yes, you can make Chocolate Cherry Icebox Pie a day before you serve it. This gives the pie time to chill and set well in the fridge. If you want the best taste, prepare it at least four hours ahead. However, overnight is best. This allows the flavors to blend nicely, making each bite even more delicious.
What can I use instead of cream cheese?
If you need a cream cheese substitute, try Greek yogurt or silken tofu. Both options provide a creamy texture. Greek yogurt adds a slight tang, while silken tofu is a great choice for a dairy-free option. Just blend them until smooth before adding them to your pie filling.
How do I serve Chocolate Cherry Icebox Pie?
For serving, slice the pie into wedges and place on plates. A drizzle of chocolate over each slice adds flair. You can also top it with fresh cherries for a pop of color. Serve it with a dollop of whipped cream for extra creaminess.
Is it possible to make this recipe vegan?
Yes, you can create a vegan version of this pie. Use vegan butter for the crust and coconut cream instead of heavy cream. Replace cream cheese with silken tofu or a vegan cream cheese. For the chocolate, ensure it's dairy-free. This way, you keep the rich taste while making it plant-based.
This blog post shared an easy recipe for Chocolate Cherry Icebox Pie. We covered the ingredients, step-by-step instructions, tips for the perfect crust and filling, and variations to try. You can even learn how to store and freeze it for later.
In the end, making this pie brings joy to any gathering. Don't be afraid to experiment with flavors and toppings. Enjoy creating your delicious masterpiece!