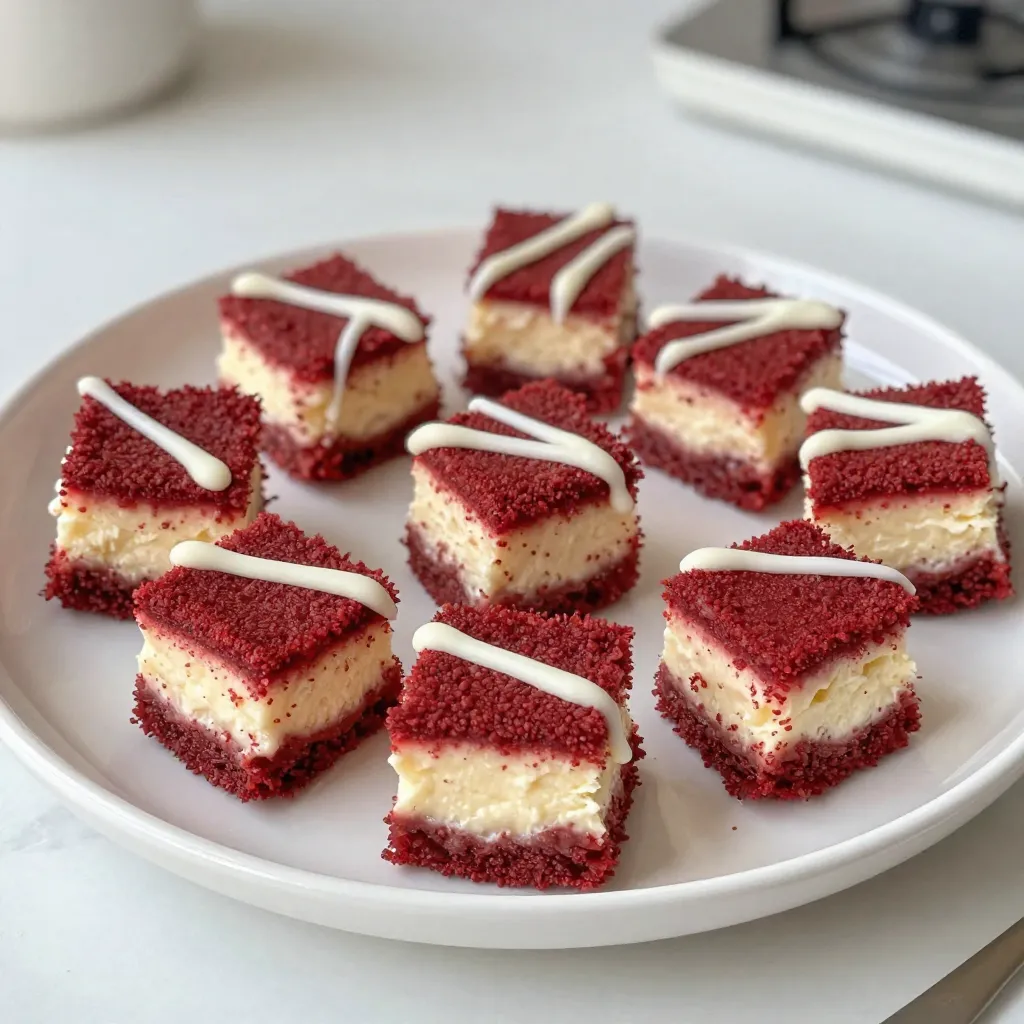
Are you ready to indulge in a delicious dessert? These Red Velvet Cheesecake Bites are the perfect treat to satisfy your sweet cravings. Imagine rich, velvety cake paired with creamy cheesecake in a bite-sized form. They’re easy to make and look stunning on any dessert table. Join me as we dive into the tasty ingredients, simple steps, and clever tips to create these irresistible bites. Let’s get started!
Why I Love This Recipe
- Deliciously Decadent: These cheesecake bites combine the rich flavors of red velvet cake with creamy cheesecake, making them an irresistible treat.
- Perfect for Any Occasion: Whether it’s a party, holiday, or just a cozy night in, these bites are sure to impress your guests.
- Easy to Make: With simple ingredients and straightforward steps, anyone can whip up these delightful bites without any fuss.
- Customizable: Feel free to add your favorite toppings or mix-ins, such as nuts or different types of chocolate, to make them your own!
Ingredients
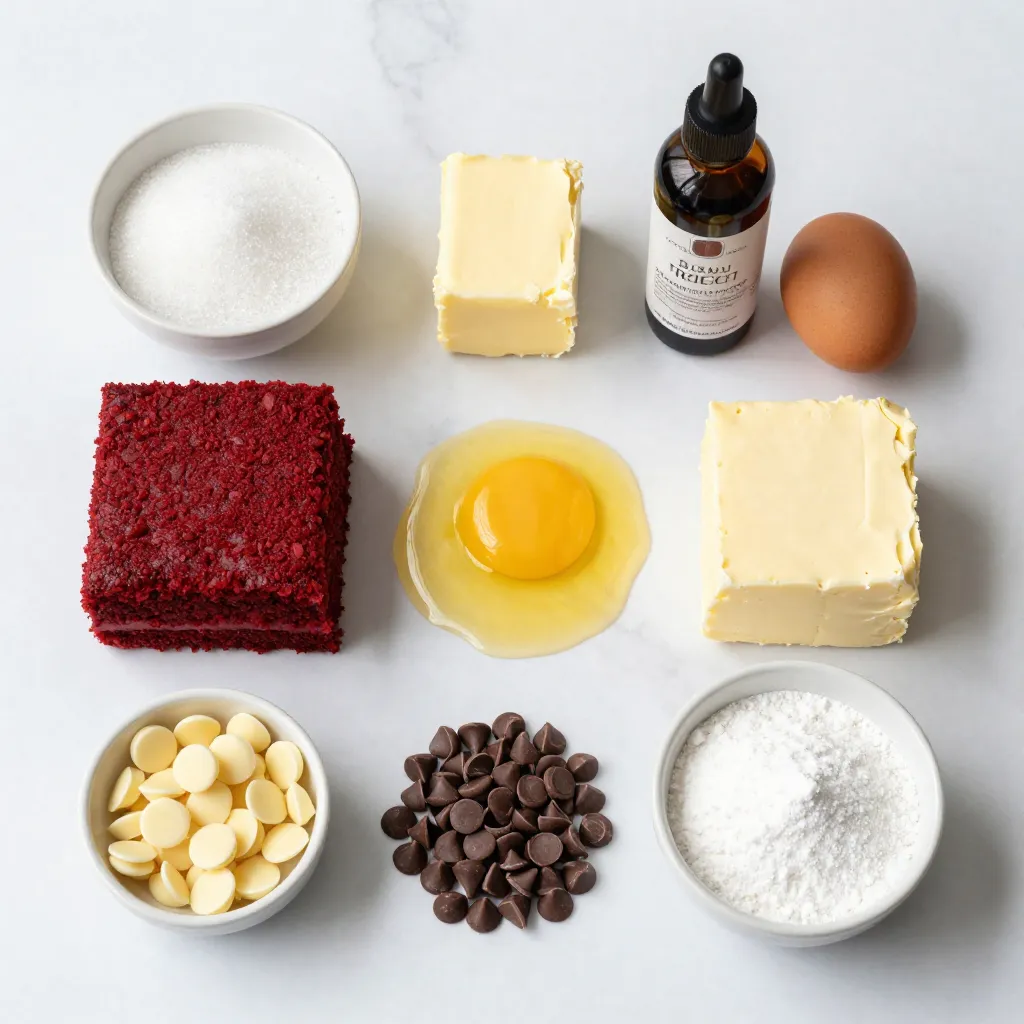
List of Ingredients
– 1 cup red velvet cake mix
– 1/4 cup sugar
– 1/2 cup unsalted butter, melted
– 1/2 teaspoon vanilla extract
– 1 egg
– 8 oz cream cheese, softened
– 1/4 cup powdered sugar
– 1/2 teaspoon vanilla extract (for cheesecake filling)
– 1/4 cup mini chocolate chips (optional)
– White chocolate chips (for drizzling)
Optional Ingredients
– Mini chocolate chips for a fun texture
– Fresh raspberries for a bright finish
– Sprinkles to add a festive touch
Equipment Needed
– Mixing bowls for combining ingredients
– Electric mixer for smooth cheesecake filling
– Mini muffin tin to shape the bites
– Paper liners to prevent sticking
– Microwave-safe bowl for melting chocolate
– Zip-top bag for easy drizzling
Step-by-Step Instructions
Prepping the Oven and Muffin Tin
First, set your oven to 350°F (175°C). This temperature helps the bites bake evenly. While the oven heats, line a mini muffin tin with paper liners. This step keeps the bites from sticking and makes them easy to serve.
Making the Red Velvet Cake Batter
Next, grab a mixing bowl. Combine 1 cup of red velvet cake mix with 1/4 cup sugar. Add 1/2 cup melted unsalted butter and 1/2 teaspoon vanilla extract. Crack in 1 egg. Mix everything together until it is smooth and well blended. This batter will give you a rich base.
Baking the Red Velvet Base
Now, spoon about 1 tablespoon of the batter into each muffin liner. Fill them halfway. Place the muffin tin in the oven and bake for about 15 minutes. Check with a toothpick. If it comes out clean, they’re ready. Let the bites cool completely before moving on.
Preparing the Cheesecake Filling
In another bowl, beat 8 ounces of softened cream cheese with an electric mixer. Mix until it’s smooth. Add 1/4 cup powdered sugar and 1/2 teaspoon vanilla extract. Blend until it’s well combined. If you like, fold in 1/4 cup mini chocolate chips for extra flavor.
Assembling the Cheesecake Bites
Once the red velvet bases are cool, make a small dip in the center of each bite. You can use your finger or a small spoon. Fill each dip with the cheesecake mixture until it reaches the top. This creates a perfect layer of cheesecake.
Chilling and Drizzling
Chill the assembled bites in the fridge for at least 1 hour. This helps the cheesecake set. For the drizzle, melt white chocolate chips in a microwave-safe bowl. Melt in 30-second intervals until smooth. Transfer the melted chocolate to a zip-top bag. Snip a corner and drizzle it over the chilled bites. Serve these bites cold for a delightful treat!
Tips & Tricks
Choosing the Right Cake Mix
When picking a cake mix, choose one with bright red color. A good red velvet cake mix will give you rich flavor and a lovely hue. Check the ingredients; the best mixes have cocoa powder and no artificial colors. If you like, you can use a homemade red velvet recipe instead. This gives you control over the taste and quality.
Perfecting the Cheesecake Texture
Getting the cheesecake just right is key. Start with softened cream cheese to avoid lumps. Use an electric mixer for a smooth finish. Mix until creamy, then add powdered sugar slowly. This helps blend well. If you use mini chocolate chips, fold them in gently. You want a creamy filling that holds its shape but is still soft.
Presentation Tips for Serving
Presentation makes your bites even more appealing. Use a decorative plate to showcase your cheesecake bites. Drizzle melted white chocolate on top in fun patterns. You can also add fresh raspberries or colorful sprinkles for a pop of color. This not only looks great but adds extra flavor too. Enjoy impressing your family and friends with these stunning treats!
Pro Tips
- Use Room Temperature Ingredients: Ensure your cream cheese is at room temperature for a smooth filling. Cold cream cheese can result in lumps.
- Don’t Overfill: When adding the cheesecake filling, be careful not to overfill the bites, as they may overflow during chilling.
- Experiment with Flavors: Consider adding a splash of almond extract to the cheesecake filling for an extra layer of flavor.
- Storage Tips: Store any leftovers in an airtight container in the refrigerator for up to three days for the best taste.
Variations
Different Cheesecake Fillings
You can change the flavor of your cheesecake bites. Try adding different fillings. Here are some ideas:
– Chocolate Cheesecake: Use cocoa powder in the cream cheese mix for a rich taste.
– Berry Cheesecake: Add pureed strawberries or raspberries for a fruity twist.
– Nutty Cheesecake: Mix in crushed nuts like pecans or walnuts for crunch.
These options let you customize your bites for any event.
Alternative Toppings or Drizzles
Toppings make these bites even more fun. You can try a few different ideas:
– Caramel Sauce: Drizzle warm caramel over the bites for a sweet finish.
– Fruit Garnish: Top with fresh berries or banana slices for a fresh look.
– Candy Sprinkles: Add colorful sprinkles for a festive touch.
These toppings can change the whole look and taste of your treats.
Gluten-Free or Vegan Options
You can easily adapt the recipe for special diets. Here’s how:
– Gluten-Free: Use gluten-free red velvet cake mix for the base.
– Vegan: Replace the egg with a flax egg and use dairy-free cream cheese.
These options let everyone enjoy the deliciousness of cheesecake bites.
Storage Info
How to Store Leftovers
Store your Red Velvet Cheesecake Bites in an airtight container. Keep them in the fridge. They will stay fresh for up to five days. If you want to keep them longer, consider freezing.
Freezing Instructions
To freeze, place the bites in a single layer on a baking sheet. Make sure they don’t touch. Freeze them for about two hours until solid. Then, transfer them to a freezer-safe bag or container. They will last for up to three months in the freezer.
Reheating or Refreshing
When you’re ready to enjoy a frozen bite, take it out of the freezer. Let it sit at room temperature for about 15 minutes. This will help soften it. If you want a warm treat, microwave it for about ten seconds. Avoid overheating to keep the cheesecake creamy.
FAQs
Can I make Red Velvet Cheesecake Bites in advance?
Yes, you can make Red Velvet Cheesecake Bites ahead of time. I recommend making them a day before your event. Once you chill them, they will taste even better. Just keep them in the fridge until you are ready to serve.
What can I substitute for cream cheese?
If you need a cream cheese substitute, try using mascarpone cheese. It has a similar texture and taste. You can also use Greek yogurt for a healthier option. Just make sure it is plain and unsweetened.
Where can I buy pre-made Red Velvet Cheesecake Bites?
You can find pre-made Red Velvet Cheesecake Bites at many bakeries and grocery stores. Some stores have them in their frozen dessert section. You can also check online bakeries that offer shipping.
Are these bites suitable for parties or events?
Yes, these bites are perfect for parties! They are small and easy to eat. Their vibrant color and taste can impress your guests. You can also make a big batch, so everyone can enjoy them.
Red Velvet Cheesecake Bites are simple and fun to make. You learned about key ingredients, equipment, and step-by-step instructions. We discussed tips to improve texture and presentation. Plus, there are tasty variations to try. Don’t forget how to store, freeze, or refresh leftovers.
These bites are sure to impress at any gathering. I hope you enjoy making them as much as I d