Looking for a fun and tasty breakfast? Stuffed French Toast Roll-Ups are the perfect treat! These easy-to-make rolls are filled with sweet surprises and coated in the classic French toast mix. Whether you enjoy them on a lazy weekend or want a quick breakfast option, these roll-ups will impress you. Let’s dive into how to make this delicious dish that will brighten your mornings!
Why I Love This Recipe
- Easy to Prepare: This recipe is simple and quick, making it perfect for breakfast or brunch without a lot of fuss.
- Customizable Filling: You can easily switch up the filling with your favorite fruits or spreads, making it versatile for any taste!
- Deliciously Indulgent: With the creamy filling and cinnamon sugar coating, these roll-ups are a sweet treat that everyone will love.
- Perfect for Sharing: These roll-ups are great to serve at gatherings or family breakfasts, inviting everyone to enjoy a delightful bite.
Ingredients
List of Ingredients
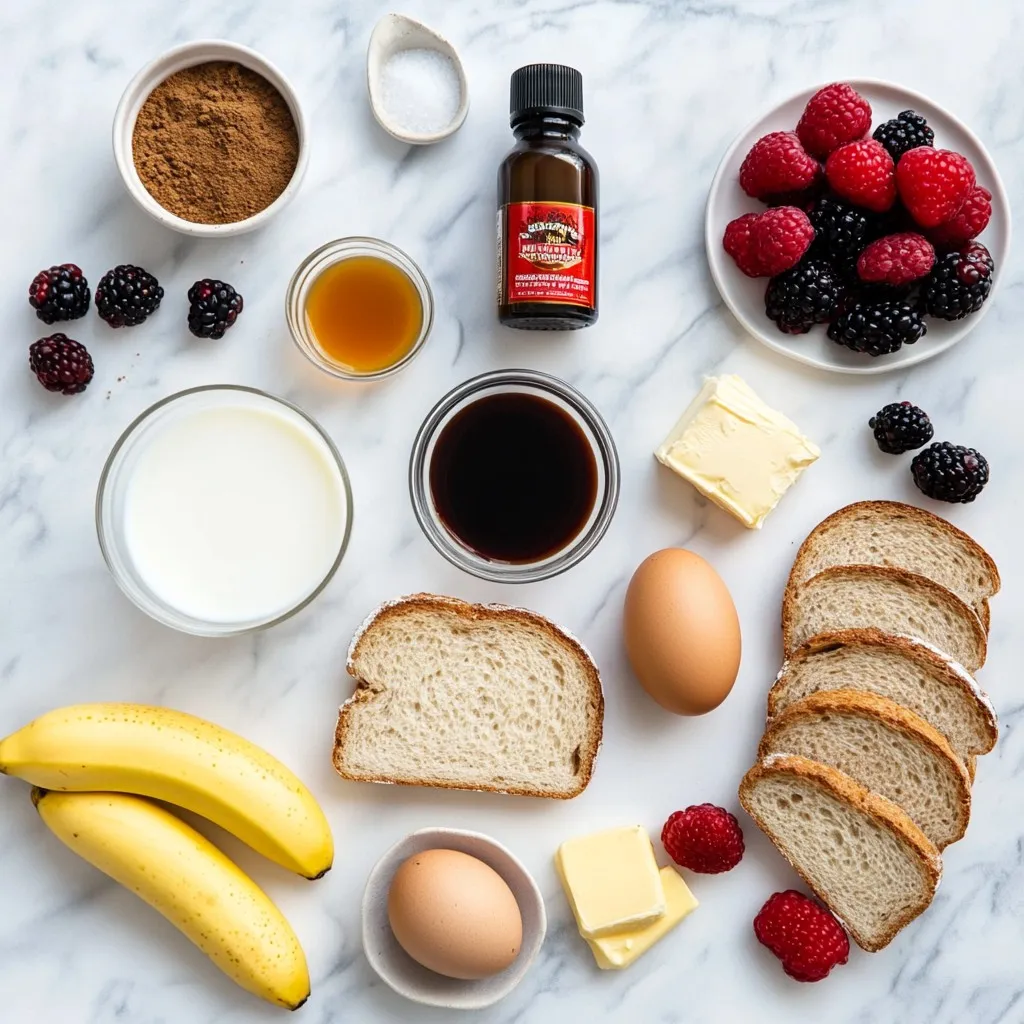
To make Stuffed French Toast Roll-Ups, gather these ingredients:
– 8 slices of white or whole wheat bread
– 4 ounces cream cheese, softened
– 1 ripe banana, mashed (or your choice of fruit)
– 1 teaspoon vanilla extract
– 2 large eggs
– 1/2 cup milk
– 1 tablespoon cinnamon
– 1/4 cup granulated sugar
– 2 tablespoons butter (for cooking)
– Fresh berries and maple syrup for serving (optional)
Substitutions and Alternatives
You can easily swap some ingredients. Use almond or cashew cream for a dairy-free option. Instead of banana, try strawberries or apples. Whole grain bread works well if you want more fiber. You can replace butter with coconut oil for a different flavor.
Equipment Needed
Make sure you have these tools ready:
– A rolling pin for flattening the bread
– A bowl for mixing the filling
– A whisk for the egg mixture
– Two shallow dishes for the egg wash and cinnamon sugar
– A non-stick skillet for cooking
– A spatula for flipping the roll-ups
Step-by-Step Instructions
Preparing the Filling
To start, I mix the cream cheese, mashed banana, and vanilla extract in a bowl. I want a smooth and creamy texture. This filling adds a sweet and rich flavor. You can use other fruits too, like strawberries or blueberries, for a twist. Just make sure the fruit is ripe for the best taste.
Flattening the Bread
Next, I take my slices of bread and flatten each one. I use a rolling pin for this. Flattening makes it easier to roll the bread without tearing. It also helps the roll-ups cook evenly. I like to use white or whole wheat bread. Both work great!
Rolling and Coating the Roll-Ups
Now, I spread about one tablespoon of the filling on one end of each slice. I roll it up tightly, making sure the filling stays inside. I repeat this for all the slices. After rolling, I mix cinnamon and sugar in a shallow dish. This will coat the roll-ups later for a tasty finish.
Cooking Instructions
For cooking, I heat a non-stick skillet over medium heat. I add butter and let it melt. I dip each roll-up into the egg and milk mixture, letting the extra drip off. Then, I place the roll-up seam-side down in the skillet. I cook each side for about 2-3 minutes, until golden brown. Once cooked, I roll each warm roll-up in the cinnamon sugar. This gives it a sweet and crunchy coating. Now, they’re ready to serve! Enjoy with maple syrup and fresh berries on top if you like!
Tips & Tricks
Common Mistakes to Avoid
One big mistake is not flattening the bread enough. If the slices are too thick, they won’t roll well. Another mistake is overfilling. Use about a tablespoon of filling for each roll. If you add too much, it will spill out during cooking. Lastly, don’t skip the cinnamon sugar coating; it adds great flavor.
Perfecting the Roll-Ups
To ensure a tight roll, start at one end and roll slowly. Use your fingers to tuck in the filling as you go. Make sure the seam is on the bottom when you place it in the skillet. This keeps the filling secure and helps it cook evenly. If you find the bread tearing, try using slightly older bread. Stale bread works better for rolling.
Serving Suggestions
Serve these roll-ups warm for the best taste. Drizzle maple syrup on top for a sweet touch. Fresh berries make a great topping too. You can also add whipped cream for a fun twist. These roll-ups pair well with coffee or milk, making them perfect for breakfast or a snack.
Pro Tips
- Choose the Right Bread: Opt for thicker slices of bread like Texas toast or challah for a more indulgent roll-up that holds up well during cooking.
- Experiment with Fillings: Try different fruits like strawberries, blueberries, or even chocolate chips to customize the flavor of your roll-ups.
- Don’t Overcrowd the Pan: Cook the roll-ups in batches rather than overcrowding the skillet to ensure they cook evenly and achieve a perfect golden brown.
- Serving Suggestions: Serve with a sprinkle of powdered sugar or a dollop of whipped cream for an extra treat!
Variations
Flavorful Fillings Ideas
You can switch up the filling for your stuffed French toast roll-ups. Here are some fun ideas:
– Nutella and Strawberries: Spread Nutella on the bread and add sliced strawberries.
– Peanut Butter and Jelly: Use peanut butter with your favorite jelly for a classic combo.
– Apple Cinnamon: Cook diced apples with cinnamon and sugar, then fill the roll-ups.
– Chocolate Chip Cream Cheese: Mix cream cheese with chocolate chips for a sweet treat.
These options keep things fresh and exciting. You can mix and match flavors to find your favorite.
Dietary Modifications (Vegan, Gluten-Free)
Want to make these roll-ups fit your diet? Here’s how:
– Vegan: Replace cream cheese with a vegan alternative. Use almond or coconut milk instead of regular milk. Substitute eggs with flaxseed meal mixed with water.
– Gluten-Free: Use gluten-free bread. Make sure all other ingredients are gluten-free too.
These changes let everyone enjoy this tasty treat.
Unique Toppings and Sauces
Toppings can really enhance your roll-ups. Try these ideas:
– Maple Syrup Drizzle: Classic and sweet, it pairs well with the roll-ups.
– Honey: A natural sweetener that adds a nice touch.
– Whipped Cream: Light and fluffy, it makes the dish feel special.
– Fresh Fruit: Add sliced bananas, strawberries, or blueberries for color and flavor.
These toppings add layers of flavor and fun to your meal. Enjoy exploring new combinations!
Storage Info
Storing Leftovers
You can store leftover stuffed French toast roll-ups in an airtight container. Keep them in the fridge for up to three days. Make sure they cool down before sealing the container. This helps keep them fresh and tasty.
Reheating Instructions
To reheat, use a non-stick skillet over medium heat. Place the roll-ups in the pan and heat for about two minutes on each side. This method keeps them crispy. You can also use a microwave for quick reheating. Just heat them for about 30 seconds, but they won’t be as crispy.
Freezing Options
You can freeze these roll-ups for later. First, let them cool completely. Then, wrap each roll-up in plastic wrap and place them in a freezer bag. They can stay in the freezer for up to three months. When ready to eat, just thaw in the fridge overnight and reheat as instructed.
FAQs
How long do Stuffed French Toast Roll-Ups last?
Stuffed French toast roll-ups last about 2 to 3 days in the fridge. Store them in an airtight container. This keeps them fresh and tasty. If you notice any change in smell or texture, it’s best to toss them.
Can I make these ahead of time?
Yes, you can make these ahead of time. Prepare the roll-ups and store them in the fridge. You can cook them later for a quick breakfast. Just remember to cook them within 2 days for the best flavor.
What else can I use as a filling?
You can use many fillings! Try Nutella, peanut butter, or applesauce. Cream cheese pairs well with berries, too. Feel free to mix and match your favorite fruits and spreads for unique flavors.
Can I bake Stuffed French Toast Roll-Ups instead of frying?
Absolutely! Baking is a great option. Preheat your oven to 375°F (190°C). Place the roll-ups on a baking sheet lined with parchment paper. Bake for about 15-20 minutes until they are golden brown. This method reduces oil and keeps them crispy.
In this post, we covered how to make delicious Stuffed French Toast Roll-Ups. I shared the ingredients, cooking steps, tips, and cool variations. Remember, using the right tools makes cooking easier. Avoid common mistakes, and consider different fillings based on your diet. Store leftovers properly to enjoy them later. I hope you feel inspired to create these fun treats. With practice, you’ll master the roll-ups and impress your family and friends. Enjoy your cooking journe